SSyndigo Global Community
Turn on suggestions
Auto-suggest helps you quickly narrow down your search results by suggesting possible matches as you type.
Showing results for
- Customer Community
- Customer Community Knowledge Base
- Platform Basics Knowledge Base
- Mappings
- How to Map Multi-Value Attributes and Combine Mult...
Options
- Article History
- Subscribe to RSS Feed
- Mark as New
- Mark as Read
- Bookmark
- Subscribe
- Printer Friendly Page
- Report Inappropriate Content

 CommunityMod_WM
Community Manager
Options
- Article History
- Subscribe to RSS Feed
- Mark as New
- Mark as Read
- Bookmark
- Subscribe
- Printer Friendly Page
- Report Inappropriate Content
35m ago - edited 24m ago
This article is a guide to mapping multi-value source attributes and to combining multiple source attributes into a single target attribute. It first explains how to configure a multi-value attribute and then covers the two combination methods, Concatenate and Combine with Math, along with the supporting settings available for each. Please review the content below to learn how to create these mappings.
Article Contents:
- Multi-Value Attribute Mapping
- Many Attributes to One (Concatenate)
- Combine with Math Operation
- Available Mapping Configuration Options
- Key Takeaways
- Help & Resources
Multi-Value Attribute Mapping
What it is: A multi-value mapping lets you map a source attribute that holds multiple values into a target attribute. When you connect the two, a Multi-Value Configuration step asks how the multiple source values should be combined into one target.
Why use it? Use this when your source attribute contains more than one value but the target attribute expects a single value, so you can control exactly which value or values are sent.
Steps:
- Connect the Source to the Target
- Click the multi-value source attribute and connect it to the target attribute.
- The Multi-Value Configuration menu appears, asking: "How should multiple source values be combined into one target?"
- Choose an Option
- First Value: Uses the first value in the source attribute.
- Last Value: Uses the last value in the source attribute.
- Value Index: Picks a single value by its position.
- All Values: Combines every value into one string.
- First or Last Value
- No further settings are needed.
- Click Create Mapping at the bottom, then click Save Changes at the top to confirm.
- Value Index
- Use the Value Position field to pick one position by number.
- Use the Value Position field to pick one position by number.
- All Values
- Use the Delimiter field to choose how values are separated. It defaults to a space.
- You can use a comma, slash, period, or any other delimiter character that your target attribute accepts.
- Configure Supporting Settings (if applicable)
- Test Mapping (Recommended)
- Click Test Mapping, enter or select test source data, and review the target output.
- Create Mapping and Save Changes
- Click Create Mapping at the bottom, then click Save Changes at the top.
- Click Create Mapping at the bottom, then click Save Changes at the top.


Results:
Below we have the Linked attributes window open from within an edit screen. Within the Linked Attributes window you can see the Multi-Value Source attribute values and how our selections resulted in the Target attribute output.

Many Attributes to One (Concatenate)
What it is: A Many to One mapping combines several source attributes into one target attribute. Concatenation joins the values into a single string using a separator you choose.
Why use it? Use this when a recipient expects a single value built from several pieces of your data, so you do not need to prepare a combined attribute in your source data.
Steps:
- Create a New Mapping
- Select Create New Mapping, then choose Many to One.
- Select Create New Mapping, then choose Many to One.
- Select the Source Attributes
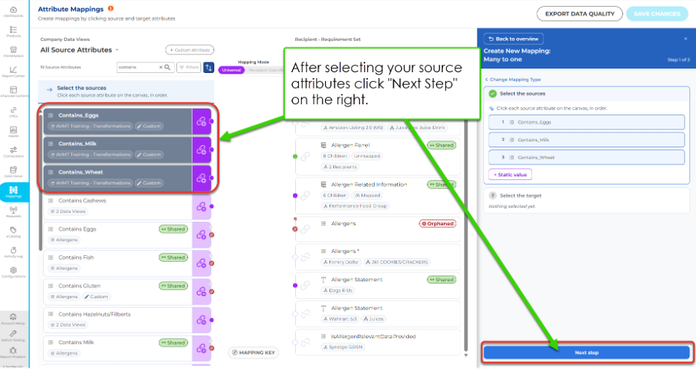
- Select multiple source attributes using multi-select. You can also add static values as sources.
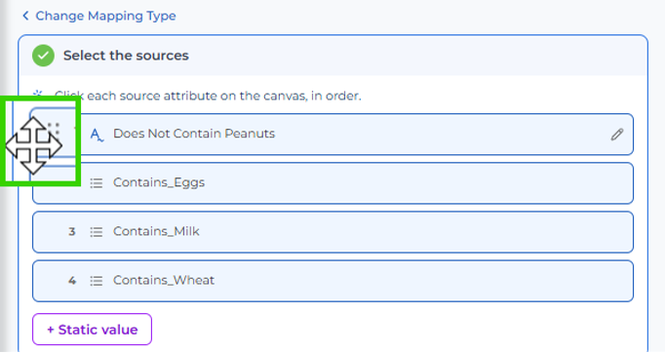
- Adjust the order of the selected sources. The order determines the final output.
- Click Next Step on the bottom right.
- Select the Target Attribute
- Choose the single target attribute that will receive the combined result. Existing compatibility rules still apply.
- Choose the single target attribute that will receive the combined result. Existing compatibility rules still apply.
- Define the Combination Method
- Select a separator, such as a comma, comma-space, or dash.
- Values are joined according to the selected source order.
- Click Create Mapping if all selections have been made.
- Configure Multi-Value Attributes (if prompted)
- If you combine incompatible attribute types, such as multi-value to simple value, a Multi-Value Configuration step appears.
- Each incompatible source has its own option: First Value (Default), Last Value, Value Index (Specific Positions), or All Values.
- Value Mapping Steps (if applicable)
- If you’re mapping Choice List attributes to a single value attribute you’ll need to review and create value mappings to ensure the data aligns correctly.
- Click Transformations then Value Mapping from within Mapping Details
- Select applicable Source Choice List options
- Click Done
- Enter/Select Target Data to map to Source Choice Values
- Repeat these steps for the other mapped source attributes
- Confirm Source Data Order
- Confirm order of selected Attributes are correct for the output you want and drag and drop Source attributes to the desired order.
- Confirm order of selected Attributes are correct for the output you want and drag and drop Source attributes to the desired order.
- Configure Supporting Settings (if applicable)
- Static Mappings
- Fallback Values/Attributes
- Transformations
- Locale Mapping
- Note: Transformations can be added per source attribute and per output.
- Note: Transformations can be added per source attribute and per output.
- Test Mapping (Recommended)
- Before you save your changes you should test the Mapping Output in case you need to edit your mappings settings.
- Click Test Mapping
- Select or Enter Test Source Input Data
- Review the Target Outputs at the bottom
- Save Changes
- Click Save Changes in the top right corner.






Results:
Below we have the Linked attributes window open from within an edit screen. Within the Linked Attributes window you can our Source attributes are correctly reflecting in the Target output field.

Combine with Math Operation
What it is: Combine with Math calculates a result from multiple source attributes and stores it in one target attribute.
Why use it? Use this when the value a recipient needs is calculated from several attributes, for example a total or a converted measurement.
Steps:
- Create a New Mapping
- Select Create New Mapping, then choose Combine with Math. The workflow matches Many to One; only the default combination method differs.
- Select Create New Mapping, then choose Combine with Math. The workflow matches Many to One; only the default combination method differs.
- Select the Source Attributes
- Choose the numeric attributes that take part in the calculation. Numeric values are expected, although non-numeric attribute types can be selected when the stored value represents numeric data.
- Multi-value attributes use only the first available entry.
- Click Next Step
- Select the Target Attribute
- Choose the target attribute that will store the result.
- Choose the target attribute that will store the result.
- Choose the Mathematical Operation
- Select an operation, such as multiplication or division.
- A single operation is applied across all selected source attributes.
- Apply Output Transformations (if applicable)
- Round, or control decimals in the result.
- Add a Math transformation to round or truncate the result, then define the output format and the number of decimal places.
- Configure Supporting Settings (if applicable)
- Static Mappings
- Fallback Values/Attributes
- Transformations
- Locale Mapping
- Note: Transformations can be added per source attribute and per output.
- Test Results
- Click Test Mapping to confirm the result. For example, 2 × 2 × 2 = 8.
- Click Test Mapping to confirm the result. For example, 2 × 2 × 2 = 8.
- Create Mapping
- Click Create Mapping at the bottom right.
- Save Changes
- Click Save Changes.


Results:
Below we have the Linked attributes window open from within an edit screen. Within the Linked Attributes window you can see the Source attributes we selected and the math operations applied resulted in the correct output for our Target attribute.

Available Mapping Configuration Options
What it is: These are optional settings you can apply to Many to One and Combine with Math mappings to control what happens when data is missing, how values are modified, and how locales are handled.
Static Mapping
What it is: A fixed value that is always included in the target attribute.
Why use it? Use it when a value must appear in every output, regardless of source data.
Steps:
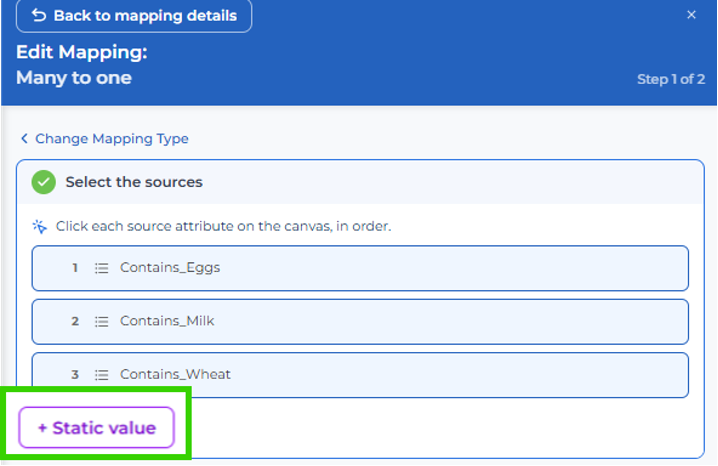
- New mapping: In the Mapping Details panel on the right, click +Static Value below the list of source attributes, then enter or select the static value.
- Existing mapping: Open the saved mapping, click +Add at the top right of Source Attributes within Mapping Details, click +Static Value, then enter or select the static value.
- Confirm the order is correct and drag and drop attributes into the correct position.
- Click Next Step at the bottom, then click Done.
- Click Create/Update Mapping.
- Click Save Changes.

Fallback
What it is: A backup source attribute or static value used when a mapped source is empty.
Why use it? Use it so the target still receives a value when the primary source is missing. Fallbacks are evaluated in the order configured, and the first available value is used.
Steps:
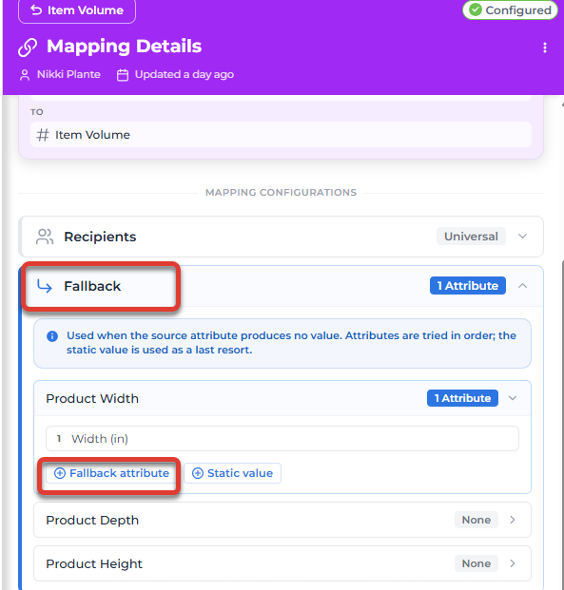
- In Mapping Details on the right, expand the Fallback menu.
- Choose the source attribute to add a fallback to. Clicking Fallback highlights the available attributes in the source column.
- Select a fallback attribute, or choose the static value option if applicable.
- Repeat for each additional source that needs a fallback.
- Click Save Changes.
Note: For a variant target attribute, the static fallback can be an invariant value or locale-specific values. A locale-specific value overrides the invariant value for that locale.
Transformations
What it is: Changes applied to a source value before combining (input) or to the combined result (output).
Why use it? Use it to format values, such as adding text or changing case, for individual sources or the final output.

Steps:
- In Mapping Details on the right, expand Transformations. You will see an input and an output option.
- Expand the source attribute (input) or the target attribute (output) you want to transform.
- Add and configure the transformation.
- Click Test Mapping to review the result.
- Click Save Changes.
Locale Mapping
What it is: Settings that apply a mapping to specific locales.
Why use it? Use it when source and target values must align by locale.

Steps:
- In Mapping Details on the right, expand Locale mapping.
- Click Specific Locales and make your selections.
- Click Add another locale if needed.
- Click Save Changes.
Key Takeaways
- Many-to-One mappings enable multiple source attributes to be combined into a single target attribute.
- Users can concatenate values or mathematically combine them.
- Source order is significant when concatenating values.
- Multi-value attributes require configuration to determine which values are used.
- Fallback attributes and fallback static values provide flexible handling for missing data.
- Transformations can be added per source attribute and per output, before or after values are combined, for both concatenation and math mappings.
- The same fallback and transformation framework is available for both concatenation and mathematical combination mappings.
- The enhancement is intended to support more advanced mapping scenarios while maintaining a workflow similar to existing mapping creation processes.
Help & Resources:
Labels:
Version history

